Summarize this article via
Some things are easy to start but hard to finish. On Facebook, lots of people create groups or business pages like it’s child’s play, but later find that they can keep looking for the “Delete group” button until they’re blue in the face but can’t see it—because it doesn’t exist.
Since you’re googling how to delete a Facebook group, you probably didn’t find the “Delete Group” button. Spoiler: it’s not hidden. It simply doesn’t exist.
Don’t worry. Just because there’s no single button that you can click to delete a Facebook group doesn’t mean it’s impossible.
It’s crazy how fast Facebook changes its interface and how long it takes to update support materials. So below, you will find an updated guide on how to delete a Facebook group.
There are two ways to do it.
OPTION 1: Delete the group permanently
Delete each member, then leave the group. It will be automatically deleted.
- You must be the group’s creator, or if the creator has left, you’re the admin. (Find out more about page roles here: https://sociality.io/blog/facebook-page-roles/)
- Your members must have agreed to delete the group.
- From your group page, go to “Members” or “People.”
- Besides the top member’s name, click “…”.
- Select “Remove from Group” (for private groups) or “Block from Group” (for public groups).
- Repeat 4 and 5 until only your name appears. (Unfortunately, there’s no shortcut for this.)
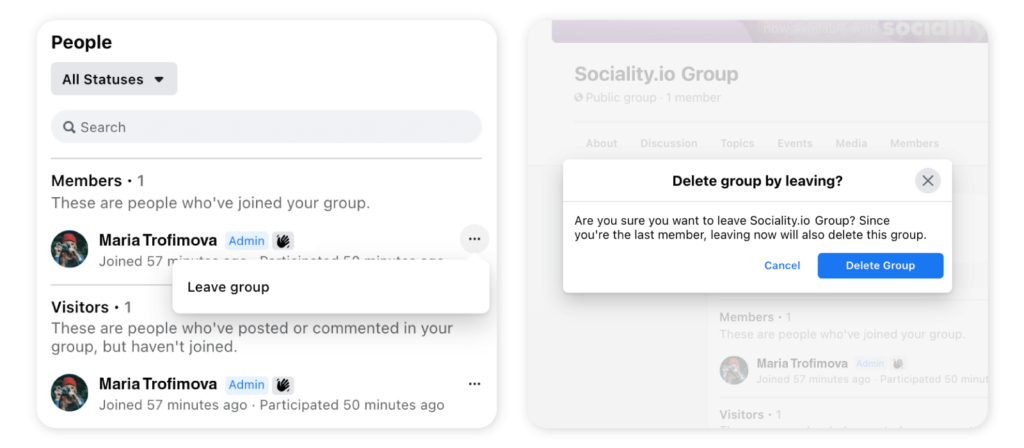
- Click “…” next to your name and select “Leave group.” Then click “Leave group” again to confirm.
Let’s look at the screenshots:
First, go to the “Members” or “People” section
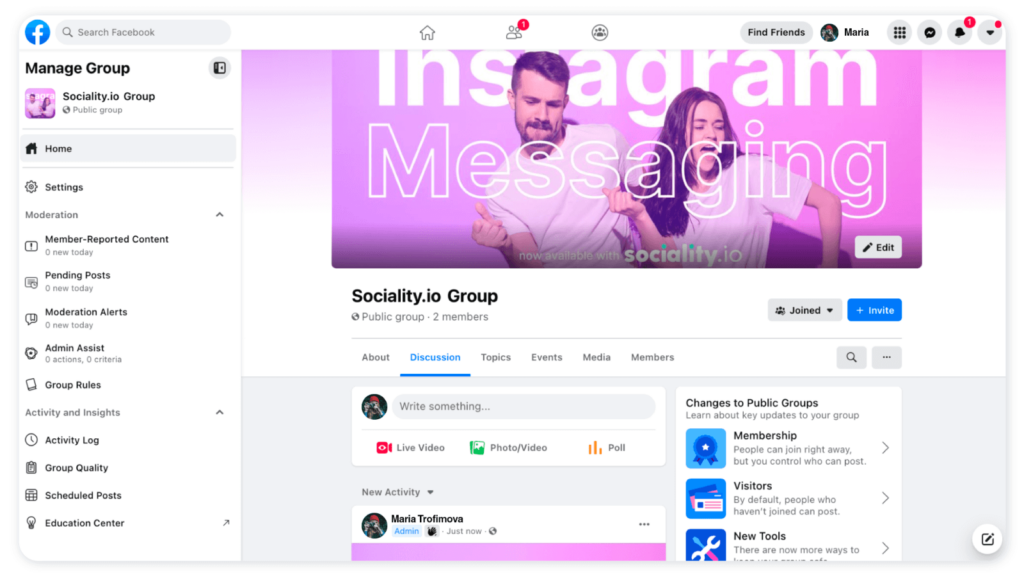
Prepare yourself for long and monotonous work, the volume of which directly depends on the number of members in your group. If the group has less than 100 members, consider yourself lucky. Deleting a couple of thousand people will take days because each participant needs to be manually removed.
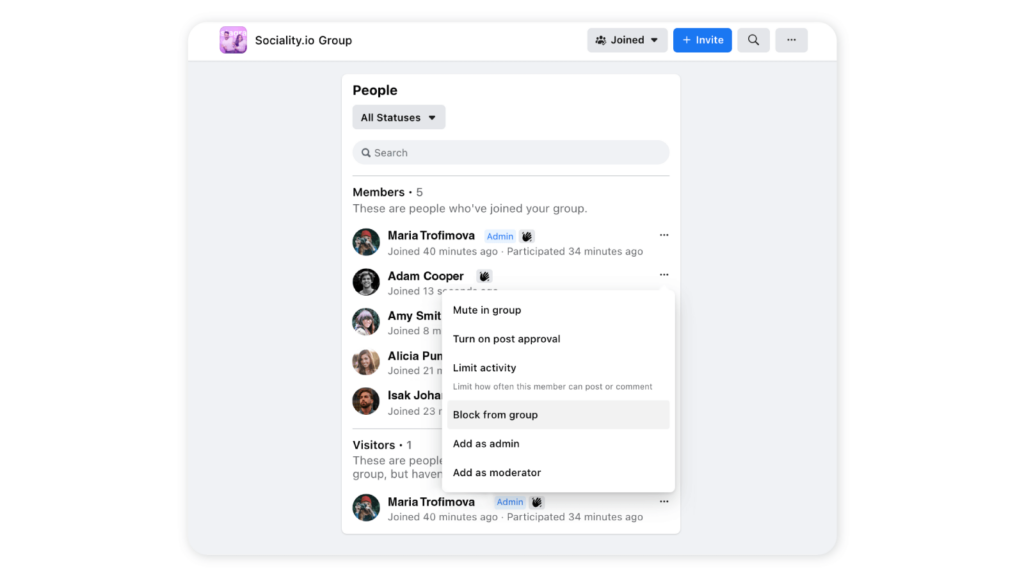
So, next to each name, you will see an icon in the form of 3 dots, which you need to click on and select “Block from group” or “Remove from group”.
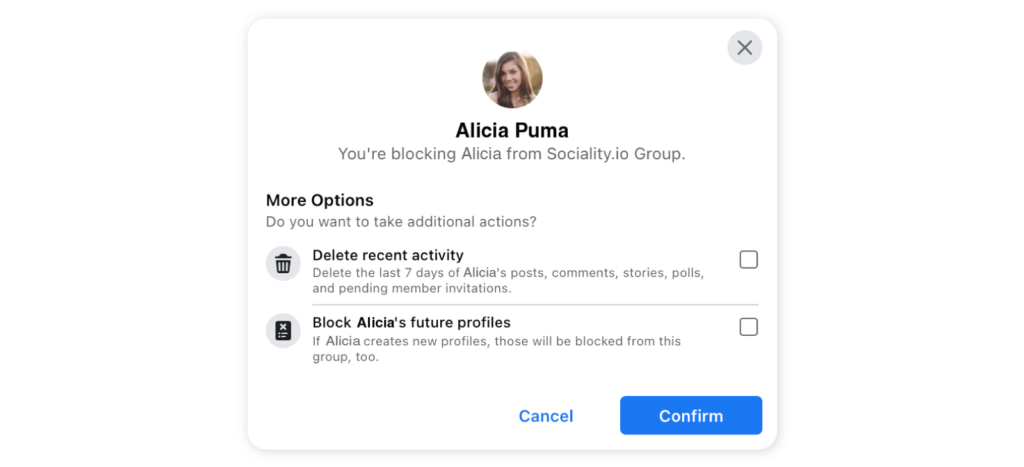
After that, the system will ask you to confirm your intentions and block recent and future activities. Click “Confirm,” and you’re done. The member is deleted, aka blocked/removed. So, now you only need to do it until the very last member.
Blocked members will disappear from member lists. However, you can find them under “Blocked” members.
The captain is last to leave a sinking ship.
To complete the process of deleting a group, you as an administrator must leave it. This must be done like a captain of the ship that is sinking – the last.
In the end, the “Delete Group” button you have been looking for will appear. After that, it is enough to confirm your intentions, and “voila” – you are removed from the group and can no longer do anything about it. If several more administrators manage a group beside you, they must be deleted before you delete yourself. Otherwise, you will have to ask them to complete the entire process.
As soon as you click on the “Leave and Delete” button, it will forever disappear from the history of Facebook.
OPTION 2 (Reversible!): Pause the group
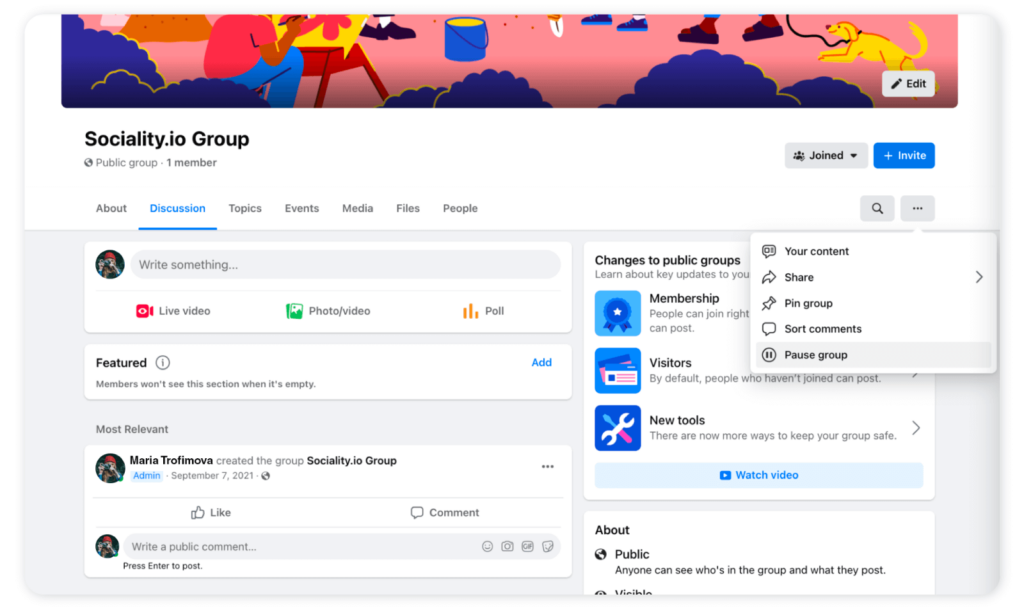
Before you go back and delete your profile, take a look at another feature that is similar to deleting a group but is less time-consuming, reversible, and keeps peoples’ memories.
“Pausing your group will make it read-only for everyone. Some tools may be limited for admins and moderators when the group is paused. You can resume at any time.”
Paused groups are technically inactive and don’t appear in the search results for the general public except for group members. Remained members still will maintain access to all photos, publications, and threads to view. Also, no new members can be invited or join the group.
When a group is paused, members can still delete their existing content, access their information, leave the group.
The beauty of pausing groups is their reversibility. Once you change your mind, you can unpause the group and bring it back to life.
After all, a Facebook group with a large following is a true asset for your business. You can continue benefiting in the future after even the longest break.
| If a group is archived… | If a group is deleted… | |
| Will the group appear in the search? | Yes | No |
| Is this action reversible? | Yes | No |
| Can any group admin perform this action? | Yes | No. Only the group’s creator (who is also an admin) can delete the group. If the creator admin is no longer a group member, any admin of the group can delete it. |
| Can new members join the group? | No, but admins can approve members who requested to join before the pause. | No |
| Can admins or group members post, comment, or add photos and videos? | No, but admins can manage posts written before the pause. | No |
| Can admins remove posts, comments, photos, and videos? | Yes | No |
| Can admins remove and block people from the group? | Yes | No |
| Can admins edit group details, including descriptions or photos? | No, except they can change the group cover photo. | No |
| Can group members or admins access their information? | Yes | No |
Final note
Please don’t delete groups without notifying their members. Some people share true friendships and memories in comments and publications. Maybe you could offer somebody else to become an Admin and leave the group without deleting it. Or at least notify its members about your actions.
✨✨✨ Related article: How to Use Facebook Ads for Beginners
Takeaways:
✨ Don’t search for the “Delete group” button. It doesn’t exist.
✨ To delete a Facebook group, remove or block each member manually, then leave the group. The group will be deleted automatically.
✨ Only the creator of the group can delete the group. (If the creator leaves the group before it is deleted, the remaining admin can delete the group—OR RUN THE GROUP INSTEAD.)
✨ Pausing a group for a time instead is reversible and much easier.
✨✨✨ Related articles:

