Anyone who’s on social media knows that Meta is and has long been one of the biggest powerhouses in the industry. As a result, it should come as no surprise that Meta is jam-packed with features that can help take your business’ social media marketing initiatives to the next level.
One of the most effective tools? The Meta pixel (formerly known as the Facebook pixel).
In this guide, we walk you through the most important details about the Meta pixel, including what it is, how it works, its benefits, and how to use them for your own brand. By better understanding the mysterious world of optimized Meta tools, you can make the most of your marketing dollars and keep up with the future of social media.
- What is the Facebook Pixel (aka Meta Pixel)?
- How does Meta Pixel work?
- What kind of data the Meta Pixel collects?
- Why install the Meta pixel?
- How to create Meta Pixel (formerly Facebook Pixel)
- How to install Meta Pixel (aka Facebook Pixel) to your website
- How to set up Meta Pixel (aka Facebook Pixel) events
- How to confirm your pixel is working with the Meta Pixel (aka Facebook Pixel) Helper
What is the Facebook Pixel (aka Meta Pixel)?
The Meta pixel is a piece of code designed to help you measure the efficacy of your Facebook ad campaigns by monitoring the action(s) users take on your website.
Because of its powerful tracking abilities, the Meta pixel is an excellent analytics tool for social media marketers to leverage. You can use the Meta pixel to not only measure the results of your ads but to ensure your ads are being seen by the right audiences and to drive more sales.
How does Meta Pixel work?
The Meta pixel uses cookies to track users’ interactions with your business on and off your Meta accounts (which include Facebook and Instagram).
You essentially add your Meta pixel to your web pages – we’ll outline how to do this in a later section – and this tiny, invisible 1×1 graphic is triggered every time a user visits that web page. The Meta pixel then collects, encrypts, and depersonalizes all the data so that only Meta can see the users that were visiting your account.
With this data, you’ll gain actionable insights into who is viewing and interacting with your ads, which ads are garnering the most clicks and conversions, and so much more. In turn, you can then uphold the practices that are working well and eliminate the ones that aren’t working at all.
What kind of data the Meta Pixel collects?
The type of data collected by the Meta pixel depends largely on the type of Meta pixel events the user triggers. An event is a specified action that a visitor takes on your website.
The Meta pixel can trigger two types of events:
- Standard events – On Meta, there are 17 preset actions that a user can trigger on your site, which are listed in the table below.
- Custom events – These are events that you can create yourself based on personalized marketing goals you have for your business.
| Website action | Description | Standard event code |
| Add payment info | The addition of customer payment information during checkout process (for example, a person clicks on a save billing information button). | fbq(‘track’, ‘AddPaymentInfo’); |
| Add to cart | The addition of an item to a shopping cart or basket (for example, clicking an Add to Cart button on a website). | fbq(‘track’, ‘AddToCart’); |
| Add to wishlist | The addition of items to a wishlist (for example, clicking an Add to Wishlist button on a website). | fbq(‘track’, ‘AddToWishlist’); |
| Complete registration | A submission of information by a customer in exchange for a service provided by your business (for example, sign up for email subscription). | fbq(‘track’, ‘CompleteRegistration’); |
| Contact | A telephone/SMS, email, chat or other type of contact between a customer and your business. | fbq(‘track’, ‘Contact’); |
| Customize Product | The customization of products through a configuration tool or other application your business owns. | fbq(‘track’, ‘CustomizeProduct’); |
| Donate | The donation of funds to your organization or cause. | fbq(‘track’, ‘Donate’); |
| Find Location | When a person finds one of your locations via web, with an intention to visit (for example, searching for a product and finding it at one of your local stores). | fbq(‘track’, ‘FindLocation’); |
| Initiate checkout | The start of a checkout process (for example, clicking a Checkout button). | fbq(‘track’, ‘InitiateCheckout’); |
| Lead | A submission of information by a customer with the understanding that they may be contacted at a later date by your business (for example, submitting a form or signing up for a trial). | fbq(‘track’, ‘Lead’); |
| Purchase | The completion of a purchase, usually signified by receiving order or purchase confirmation, or a transaction receipt (for example, landing on a “Thank You” or confirmation page). | fbq(‘track’, ‘Purchase’, {value: 0.00, currency: ‘USD’}); |
| Schedule | The booking of an appointment to visit one of your locations. | fbq(‘track’, ‘Schedule’); |
| Search | A search performed on your website, app or other property (for example, product searches or travel searches). | fbq(‘track’, ‘Search’); |
| Start trial | The start of a free trial of a product or service you offer (for example, trial subscription). | fbq(‘track’, ‘StartTrial’, {value: ‘0.00’, currency: ‘USD’, predicted_ltv: ‘0.00’}); |
| Submit application | The submission of an application for a product, service or program you offer (for example, a credit card, educational program or job). | fbq(‘track’, ‘SubmitApplication’); |
| Subscribe | The start of a paid subscription for a product or service you offer. | fbq(‘track’, ‘Subscribe’, {value: ‘0.00’, currency: ‘USD’, predicted_ltv: ‘0.00’}); |
| View content | A visit to a content page you care about (for example, a product page or landing page). View Content tells you if someone visits a web page, but not what they do on that web page. | fbq(‘track’, ‘ViewContent’ |
You can also create certain rules for events by placing parameters around the type(s) of data that your pixel collects. By using custom conversions, you can track more specific user actions.
There are two main types of rules:
- A parameter-based rule: A rule pertaining to a specific item or transaction details; for instance, only tracking users who purchase items of a certain color or who make purchases of a certain value (e.g. over $50).
- A URL-based rule: A rule pertaining to the URL; for instance, only tracking URLs that contain the word “women”.
Why install the Meta pixel?
While there are several benefits of the Meta pixel, let’s focus on our top three, as listed below.
- Improve the ROI on your ads
By tracking your ads’ performance and who is seeing your ads, you can gain better insight into how effectively you’re spending your ad dollars. You can then use these insights to adjust how you spend your ad budget and make more informed marketing decisions in the future.
Not using Facebook or Instagram ads just yet? It’s still worth installing the Meta pixel. The sooner you install it, the sooner it will start gathering data that you can use to create your first ad.
- Create retargeting ads
Retargeting essentially refers to the practice of using paid ads to target users who have already visited your site and/or social media account.
Think back to your own experiences on social media. Maybe you’re in the market for new bedding, so you search “linen bed sheets” on Google. You visit a website and browse its range of products for a bit before exiting the site and continuing on with your day. A few hours later, you open Facebook or Instagram and suddenly your feed features ads from the retailer’s site you visited earlier on. This is retargeting in practice.
Explain what these are and the integral role that Meta pixels play in creating them. Explain the benefits that retargeting ads can have (e.g. maintaining brand visibility, increasing conversions, driving sales).
- Create and leverage lookalike audiences
The Meta pixel can also help you create and benefit from lookalike audiences, which are audiences that have similar interests, behaviors, and stats to the users who already interact with your page.
By creating lookalike audiences through the use of Meta pixels, you can broaden your customer base and reach consumers you may not have even thought to target otherwise.
When creating lookalike audiences on Meta platforms, you’ll first need a source audience; this is the audience that the lookalike audience is based on. In general, your source audience should be between 1,000 and 5,000 people. However, quality is more important than quantity. For instance, depending on your objectives, you may reap greater rewards from an audience of your best customers rather than most or all of your customers.
How to create Meta Pixel (formerly Facebook Pixel)
The first step in taking full advantage of the Meta pixel is creating it. To create your Meta pixel, follow the steps below:
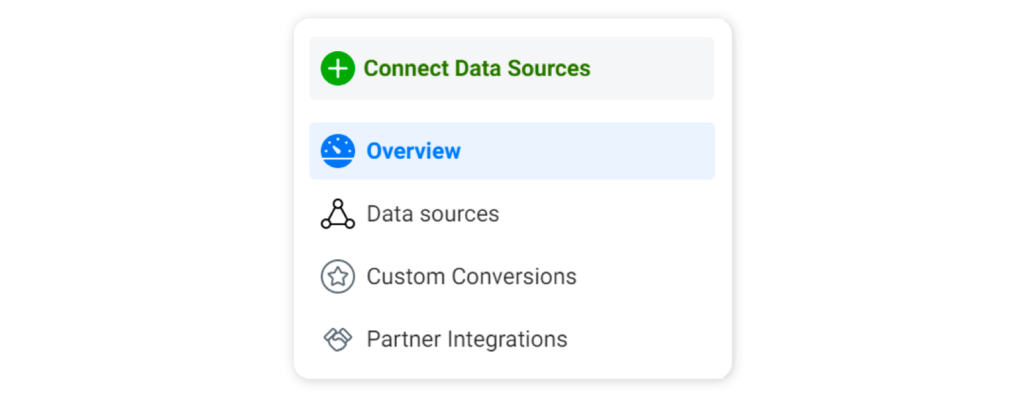
- Head to Meta Events Manager and click on + Connect data sources.
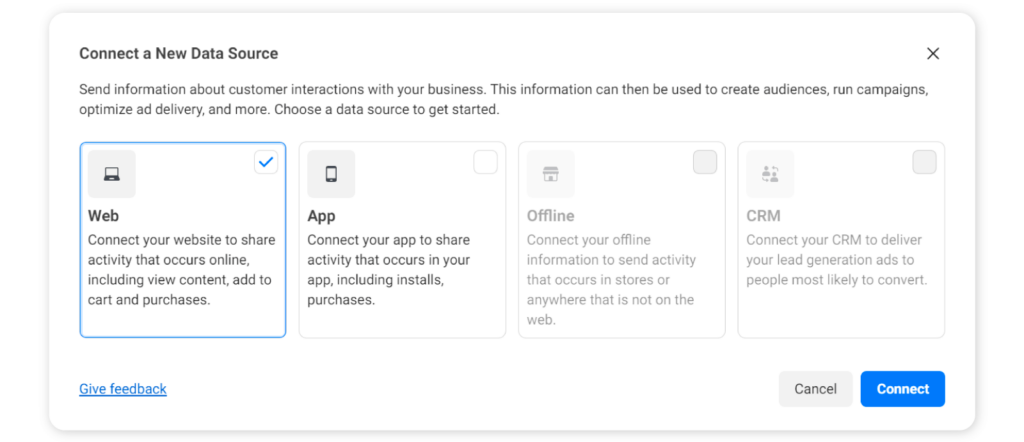
- Select Web and click Connect.
- Type in a name for your pixel and click on Create pixel. By doing this, you’ll create a new ID that you can view in Events Manager.
How to install Meta Pixel (aka Facebook Pixel) to your website
When it comes to adding your Meta pixel to your website, you have two main options for doing so:
- Installing the code manually
- Installing the code via a partner.
To install manually, follow these steps:
- Copy the pixel base code.
- Locate the header of your website (or the header template in your web platform).
- Paste the base code at the bottom of the header section, above the closing </head> tag, on every page of your website.
- Press Continue.
- If you’d like to use automatic advanced matching, this is the time to set it up. This function matches hashed customer data from your site to Facebook profiles. In turn, you can better track conversions and create bigger audiences.
- Click Continue.
To install via a partner, follow these steps:
- After naming your pixel, you’ll be prompted to enter the URL of your website to check for integration partners. Copy and paste your URL in the text bar and press Continue.
- If there is an integration partner available to you – such as WordPress, as seen below – it will automatically appear here.
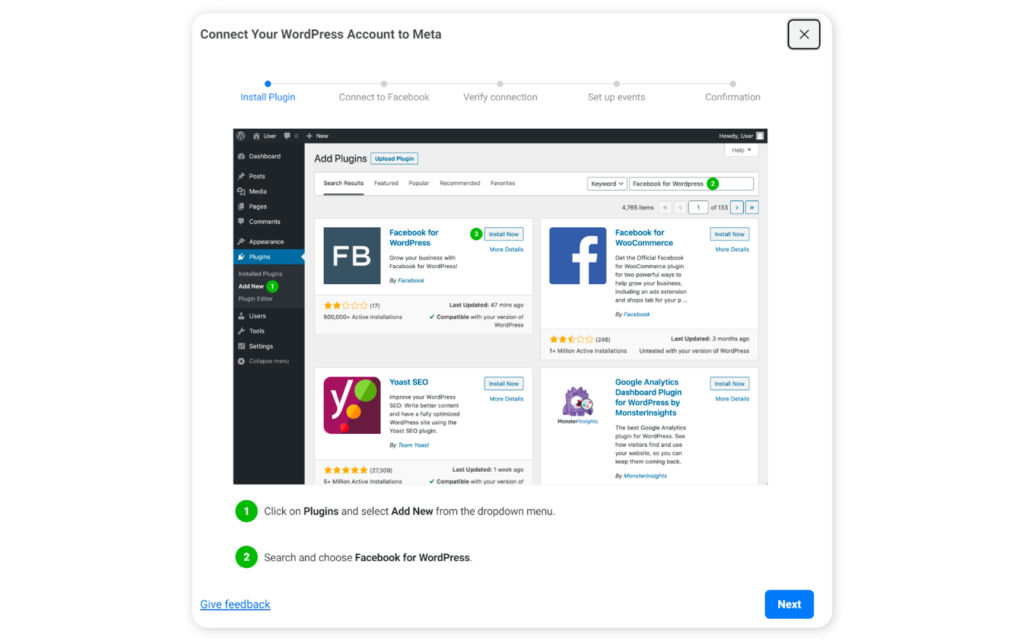
- Click Next.
- From here, follow the onscreen instructions to continue setting up your pixel through your integration partner.
How to set up Meta Pixel (aka Facebook Pixel) events
Once you’ve added your Meta pixel to your site, you can then use the Event setup tool to put standard events in place.
Here’s what you’ll need to do:
- Log into your Meta Ads Manager account and choose Events Manager from the main menu.
- Press the Data sources icon.
- Choose your pixel.
- Click Settings.
- Under Event setup, choose Open event setup tool.
- Copy and paste your URL and press Open website. This will launch the event setup tool in your browser.
- For each suggested event, click Review and select either Confirm or Dismiss.
You can learn more about how to set up events and how to put content parameters in place here.
How to confirm your pixel is working with the Meta Pixel (aka Facebook Pixel) Helper
Even if you’re confident that you’ve followed the previously listed steps meticulously, it never hurts to double-check your work.
To ensure your Meta pixel is working as it should, you’ll want to enlist the assistance of the Meta Pixel Helper as follows:
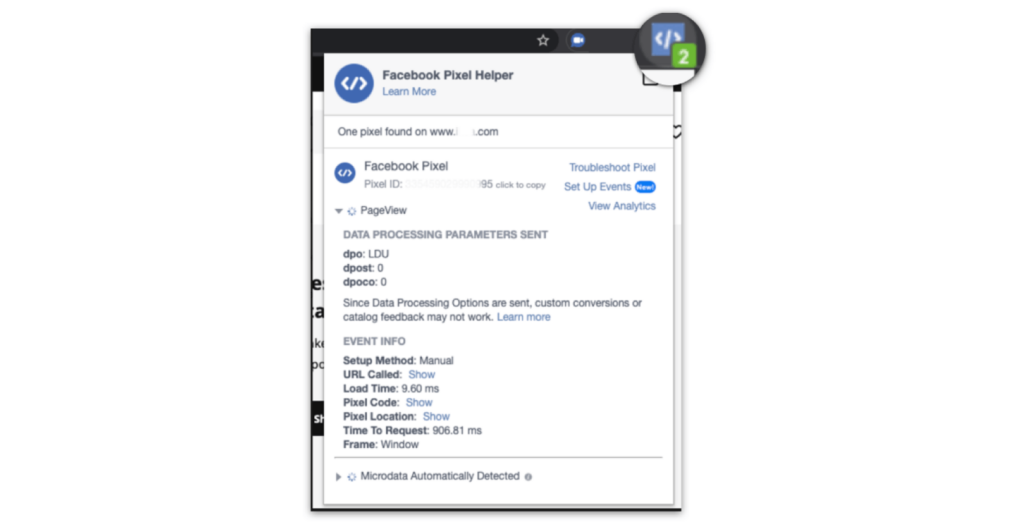
- Start by installing the Pixel Helper extension from the Chrome Store. You must use the Chrome web browser to use the browser extension.
- Once you’ve completed the installation, you should see the Pixel Helper icon in the top-right corner of your browser, along with any other browser extensions you may have.
- Navigate to your website and click on the icon. The popup will then tell you if any pixels were detected on the page and, if so, whether or not they have loaded successfully.
Conclusion
The Meta pixel is far and away one of the most effective resources available to social media marketers. Not only can it help you better understand your ad performance but it can, as a direct result, help you boost your ROI on ads, retarget ads as needed, and make the most of lookalike audiences.
By following the steps outlined in this guide, you’ll be able to reap the rewards of the Meta pixel on behalf of your brand and take its marketing efforts to new heights.

